For information about Versa Magic, our new batch note update tool, check out the Versa Magic user Guide here.
Getting Started
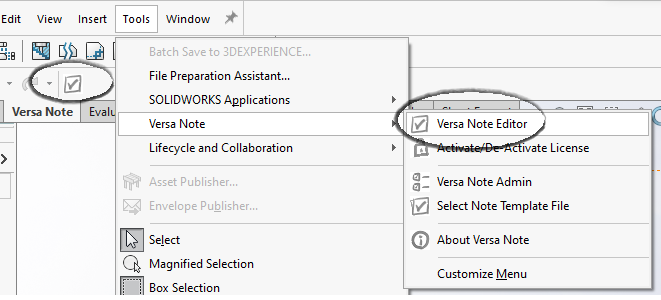
Versa Note has been pre-configured for use straight out of the box. After installation, open any SolidWorks file and click the ‘Versa Note Editor’ button in the Versa Note menu, or on the SolidWorks command manager to activate a trial license.
If you are new to Versa Note, select ‘Proceed with the Versa Note sample template’

This sample template includes several notes for a few common component types. A default category has been defined in the sample template, thus this category will be pre-selected when the editor loads.
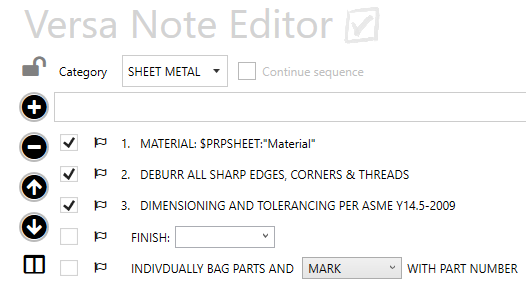
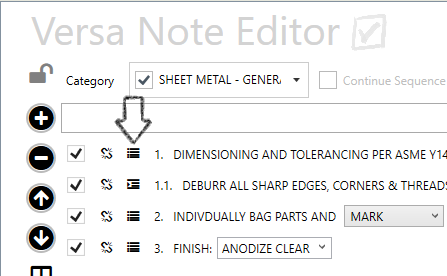
Notes with a checkmark will be added to your drawing or model. If a checked note has an editable field and/or drop-down menu, select or enter a value to add that note to your SolidWorks document.
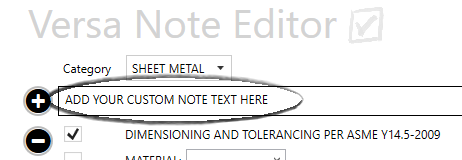
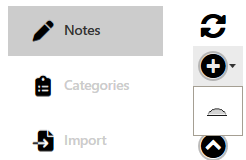
To add your own custom note, enter the note text as shown below, then click the ![]() button or press the ‘Enter’ key.
button or press the ‘Enter’ key.
To add the selected notes to your drawing, click the ![]() button in the bottom right corner of the Versa Note Editor window. To add the notes without without closing the editor window, press the
button in the bottom right corner of the Versa Note Editor window. To add the notes without without closing the editor window, press the ![]() button.
button.
By default, notes are added to the bottom left corner of the drawing, and can be re-positioned as required. The note insertion location can be configured for each of your drawing templates in the Versa Note Admin application. Notes added to model annotation views will be inserted to the right of the model.
Drawing and model notes can be modified at any time after they have been added to a drawing by opening the Versa Note Editor again. Notes can also be cleared from the drawing with the ![]() button.
button.
The Versa Note Admin application can be used to customize template notes and settings. You can read more about modifying notes and settings through the Admin application in the section below.
Notes on Multi-Sheet Drawings
Versa Note supports notes on multi-sheet drawings and on model annotation views in SolidWorks (Enterprise license required). When you open the Versa Note window, the notes for the active sheet or model annotation view will be displayed. If you wish to add notes to a different sheet or annotation view, you can do so without closing the window by selecting the sheet or annotation view from the drop-down list.
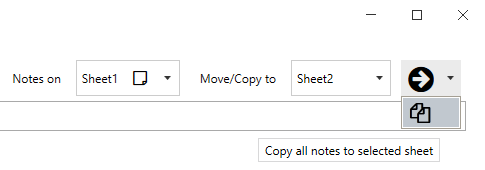
You can also move or copy all notes between drawing sheets or model annotation views by selecting a sheet from the ‘Move/Copy to’ buttons.
Linked Custom Properties, Special Values, BOM Table Items, Assy Child Properties
Linked custom properties and built-in SolidWorks special values can be added to custom notes through the Versa Note Editor window in SolidWorks and defined in template notes via the Admin application.
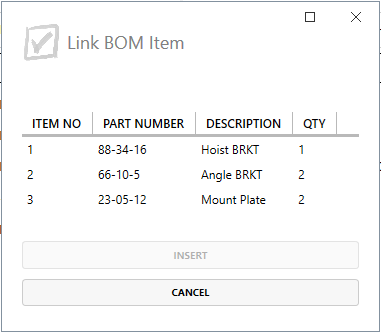
For assembly drawings, linked assembly child properties can be added, and for drawings with BOM tables, linked BOM item information can also be added. In the custom note text input box along the top of the note list, right click and select from the appropriate drop-down menu to add the desired linked value.
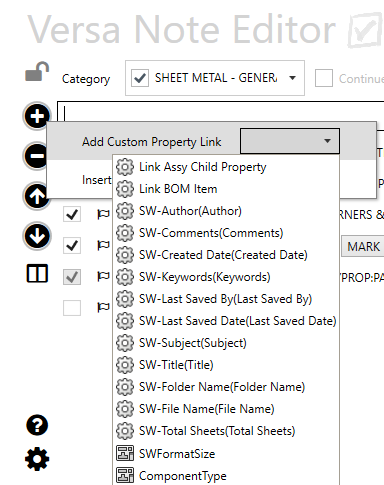
Many of these links use built-in SolidWorks link codes and will updated dynamically. Linked BOM items, on the other hand, will automatically be updated by Versa Note when the drawing is saved.
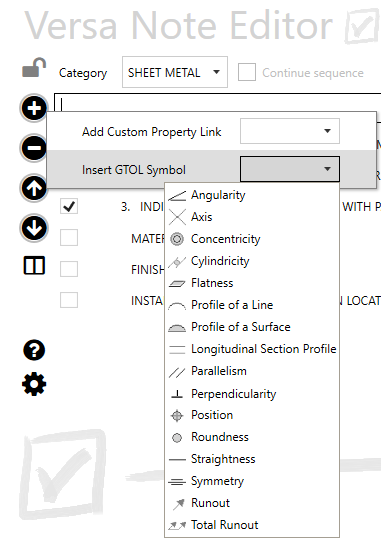
Inserting GD&T Symbols
GD&T symbols can also be added to custom notes through the Versa Note Editor window in SolidWorks. In the custom note text input box along the top of the note list, right click and select from the drop-down menu to add the desired GD&T symbol.
Linked Note Annotations/Flags
Notes can be set as flag notes or linked notes using the link or flag icons in the Versa Note Editor:

When flag or linked notes are toggled on, you will be prompted to add the corresponding linked annotation:

If notes are added, removed or re-ordered, the linked annotations/flags will be updated to match the note numbers. At any time, flag note can be added or removed using the ‘Linked Note Annotations’ menu option:

This function also allows linked annotation text to be updated by selecting the annotation. These settings, available to Professional and Enterprise license customers, can be enabled in the Versa Note Admin application.
Multi-Column Notes
On drawings with limited space or many notes, drawing notes can be split into multiple columns for added flexibility. To add a column, select a note from the list and click the ![]() button to insert a column separator before the selected note.
button to insert a column separator before the selected note.
This setting, available to Professional and Enterprise license customers, can be enabled/disabled in the Versa Note Admin application.
Indented Note Numbering
Note numbers can be indented to group related notes (e.g. 2.1, 2.2…) using the list icons in the Versa Note Editor:
Template notes can also be indented by default using the Versa Note Admin application. This setting, available to Professional and Enterprise license customers, can be enabled/disabled in the Versa Note Admin application.
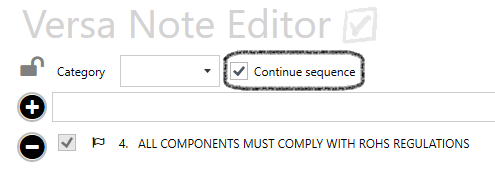
Continued Sequence Note Numbering
If a drawing sheet has notes, the note numbering sequence can be continued on the next sheet (e.g. if drawing Sheet 1 contains notes 1-3, the next note added to Sheet 2 would be note 4). If notes are added to or removed from the previous sheet, the numbers will be updated to maintain sequential numbering.
This setting, available to Professional and Enterprise license customers, can be enabled/disabled in the Versa Note Admin application.
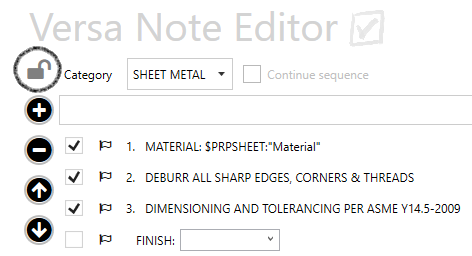
Preserved Note Numbering
Note numbering on drawings and models can be preserved in such cases where a note is removed, replacing note text with a pre-defined value (e.g. “DELETED”)
When notes are first added to a drawing or model, they are unlocked and can be re-ordered or removed as required. When the notes have been finalized (for example when the design is complete and ready for release), the notes may be locked to preserve numbering if changes are made in the future.
Notes can also be locked automatically by an external process, such as a PDM approval workflow. For more information, see the Auto Lock Notes section below. Notes can be unlocked through the Versa Note Editor UI at any time, as required.
This setting, available to Professional and Enterprise license customers, can be enabled/disabled in the Versa Note Admin application.
Transfer Notes to Model
Versa Note supports notes in drawings as well as models. To enable the transition to SolidWorks MBD (Model Based Definition), Versa Note can assist with transferring notes from drawings to model files.
If the drawing references multiple model files, select the file to transfer notes to. Next, select the destination model annotation view for the notes on each sheet.
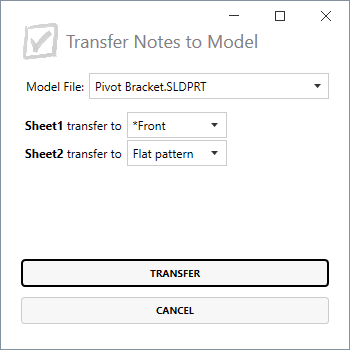
Note that the destination annotation views must already exist. If there are more sheets with notes than annotation views in the model, you must create the annotation views before attempting to transfer notes.
This setting is available exclusively to Enterprise license customers, and can be enabled/disabled in the Versa Note Admin application. A setting to allow drawing notes can also be disabled if desired.
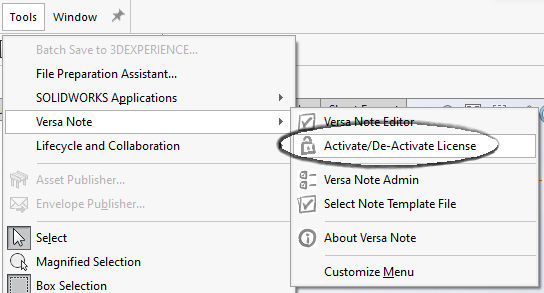
Versa Note License Activation
The Versa Note SolidWorks add-in requires a valid license and an internet connection to contact the CAD Innovations license server. After the trial period has expired, you can purchase license keys from the CAD Innovations website (each user of Versa Note requires a dedicated license). If you require assistance with an existing license, please contact support@cadinnovations.ca
To activate a new license, select the ‘Activate/De-Activate’ License option from the Versa Note menu
Enter the Versa Note license key that you were provided and click ‘Activate’

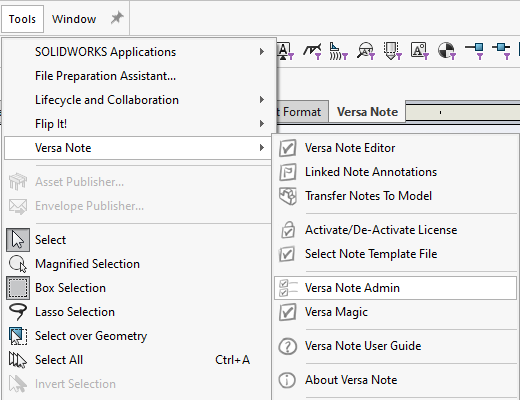
Versa Note Admin
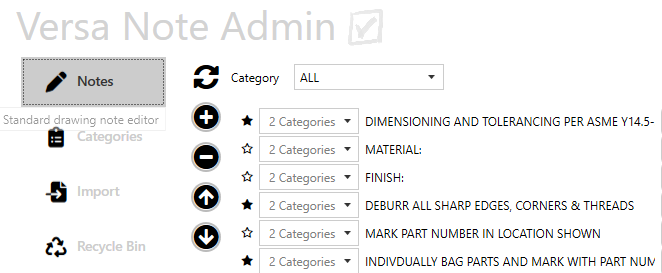
Notes Tab
The Versa Note Admin application is used to define shared drawing and model notes as well as application settings. Notes and settings can be modified with an admin-enabled Professional or Enterprise license. Versa Note Personal license users may purchase custom notes and categories.
Open the Admin app from the Windows Start menu or the Versa Note menu in SolidWorks.
To add a new note, click the button. You can also remove a note by clicking the
button and re-ordered notes using the
and
buttons.
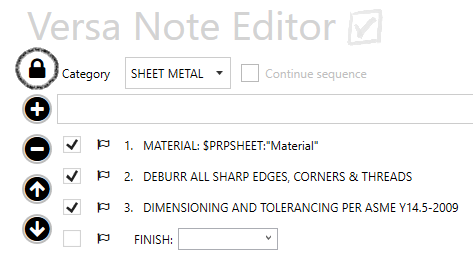
Notes are composed of alternating static text blocks and selection/entry fields. You may add static text as shown below (auto-capitalization is enabled by default, but can be disabled in settings, if desired).
Tip: The static note blocks support multi-lined notes. To add a new line, press ‘Shift-Enter’ and to exit the text block ‘Enter’.
Notes can be set up so they are added to drawings & models by default by toggling the icon to solid. Notes can be set to a flag note by toggling the
icon to solid (flag notes are disabled by default, but can be enabled in the Settings tab).
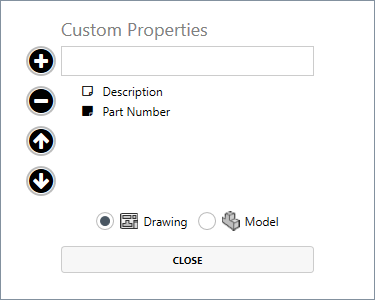
Just as with the Versa Note Editor, linked custom property values, linked BOM items, linked assembly child properties and GD&T symbols can be added to template notes. Simply right-click in any static note block & select from the appropriate drop-down menu to add the desired custom property or GD&T symbol, or right-click in the note field editor to add linked BOM items or linked assembly child properties.
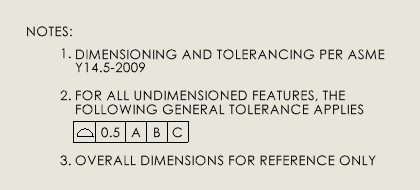
General Profile Tolerance Notes
General Profile Tolerance notes can be added, which will insert a profile feature control frame into in the SolidWorks drawing note block:
To define a general profile note in the Versa Note Admin application, click the down arrow beside the ![]() button and select the general profile symbol. The default note text can be modified, as well as the tolerance and datums.
button and select the general profile symbol. The default note text can be modified, as well as the tolerance and datums.
Optionally, general profile tolerance auto-scaling can be enabled. Click the table icon to define the tolerance scaling step function:
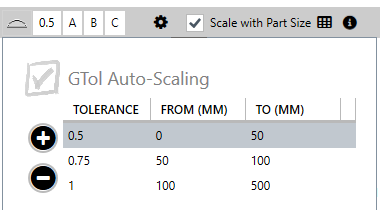
When this setting is enabled, the general profile tolerance will automatically be scaled based on the longest dimension of the component’s bounding box.
Selection/Entry Fields
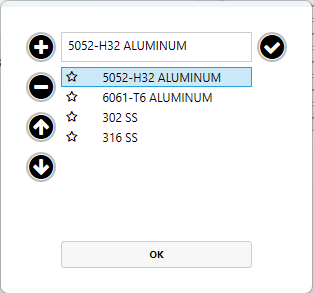
Selection/entry fields allow users to configure portions of a note before adding to a SolidWorks drawing or model. These fields can be set up to require selection from a fixed list, or set to allow designers to add custom text.
The selection/entry field list items can be modified by pressing the ![]()
button to the right of the drop-down control ![]() . Selection/entry fields can be toggled to allow user entry by toggling the
. Selection/entry fields can be toggled to allow user entry by toggling the ![]() button and fields can be set to optional with the
button and fields can be set to optional with the ![]() .
.
List items in selection/entry fields can be added, removed and re-ordered like items in the Notes tab. And just like notes, the button is used to toggle a field list entry to a ‘default’ selection. When a field item is set to default, it will bookended by an * character, and will be automatically selected by default when a user adds that note to their drawing or model.
When one or more field items have been added, exit the field list window and refresh the note list by clicking the button. A new selection/entry field will appear. Static text between the fields is optional, allowing notes to be set up with adjacent selection/entry lists, if desired.

Each note allows up to 4 selection/entry fields and 5 static text blocks. Each field can have an unlimited number of list items (however, a minimum of one list item is required).
Categories Tab
Categories provide the ability to pre-define a collection of notes for different component types, processes, or other note classification applicable to your business. They can be added via the ‘Categories’ tab in the same way as notes.
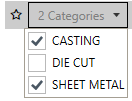
Categories can be assigned to notes by selecting from the first drop-down in each note. Notes can be assigned to multiple categories, if desired.
A category may be set to default by toggling the star icon beside the category in the ‘Categories’ tab. Default categories will be automatically selected when the Versa Note Editor is loaded in SolidWorks.
Alternatively, categories can be linked to a custom property in drawings and models, which will pre-select the category for the property value specified.

Categories can also be linked to SolidWorks drawing templates. This can be useful if you have set up individual templates for different component types or manufacturing processes.
If categories have been created, a note with no categories assigned will appear in the SolidWorks Versa Note Editor regardless of category selection.
Settings Tab
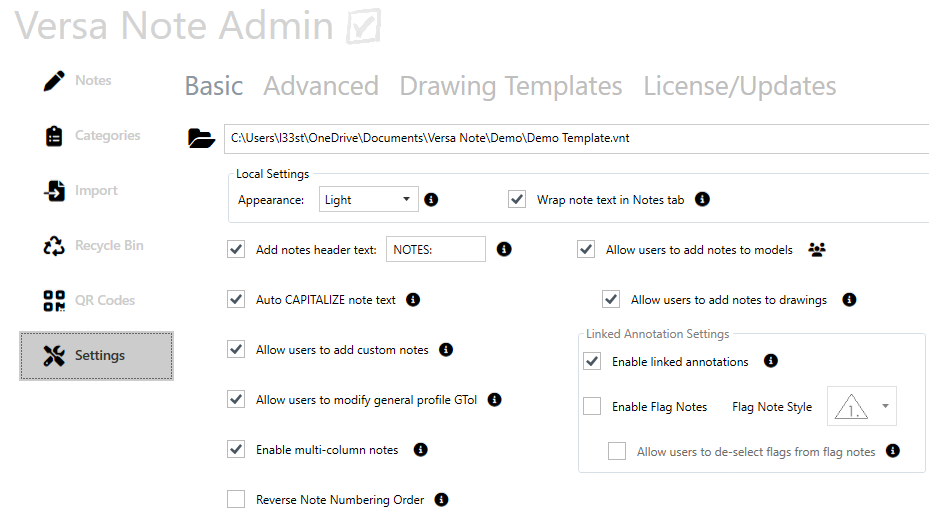
The default settings for Versa Note have been configured to work well for most businesses, but there are many options to offer precise control. Settings such as reverse note order, multi-column notes, flag notes and many other administrative options can be controlled in the Basic controls section of the Settings tab. Control over note update behavior, note sequence options and more can be found in the Advanced section. For additional information about the options, hover over the information icons beside each setting.
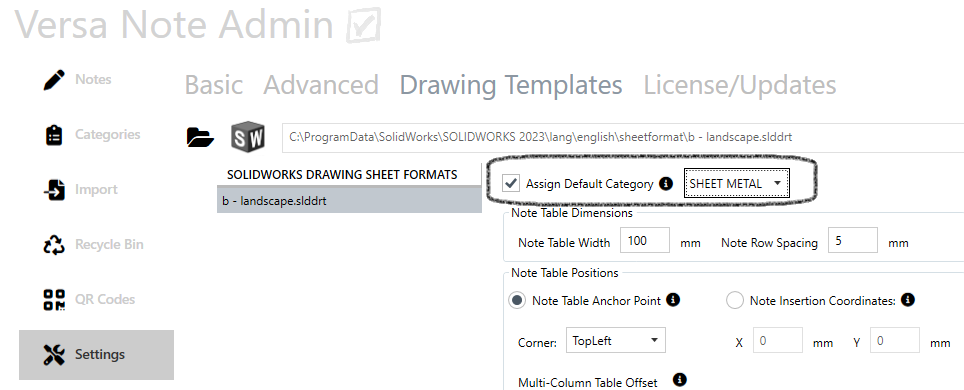
To specify the note table insertion location for a drawing template, select the Drawing Templates section and browse to your drawing sheet format location, then select a sheet format (slddrt) file, or click the SW icon to import the template location from the active drawing open in SolidWorks. Set the max note block width and select an insertion method (anchor point or coordinates) then hit the “Update” button to add the sheet format to the list.
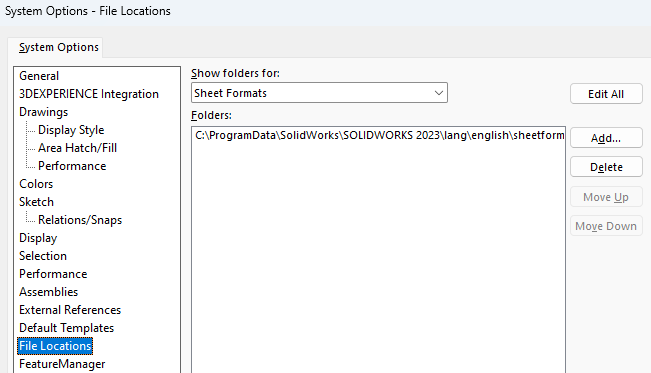
If you are unsure where your drawing sheet formats are stored, the SolidWorks drawing sheet format locations can be found in Tools -> Options -> File Locations, by selecting ‘Sheet Formats’ from the drop down:
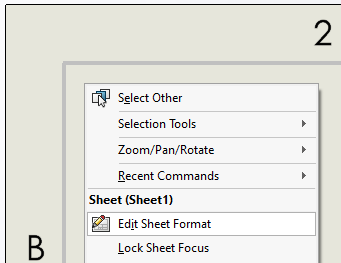
If you select the table anchor option, you must define the table anchor location in the corresponding SolidWorks drawing sheet format.
To do so, open a drawing template in SolidWorks, right click on the drawing background and select ‘Edit Sheet Format’
Next, right click on the desired anchor point and select ‘Set as Anchor’ -> ‘General Table’
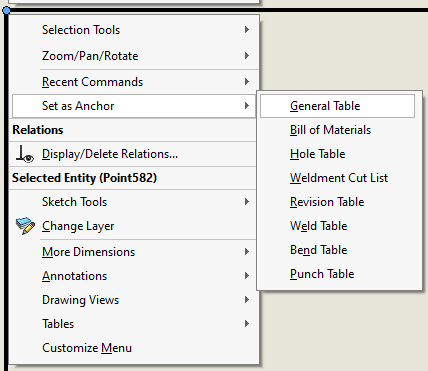
To save the changes, go to ‘File’ -> ‘Save Sheet Format’ (in SolidWorks Connected, this option can be found in ‘File’ -> ‘Publish…’)
Template File
The Versa Note template (.vnt) file is used to store all of the standard notes, categories, field lists and settings, and is read by the Versa Note SolidWorks add-in. When a user launches the SolidWorks add-in for the first time, they will be prompted to browse to the template file. You can create a new template or browse to an existing template file from the Settings tab in the Versa Note Admin application.
It is highly recommended that a single template file be used to store all drawing and model notes, and this same template file be shared by all users in a shared location that is accessible by all users. Since each template, note and category is assigned unique ID #, switching between templates can cause issues and this practice is discouraged. Notes from multiple template files can be combined into a single file using the Versa Note Admin Import function, if required.
Each time the changes are saved via the Versa Note Admin application, the last 5 saves are stored as backup files. In the event of an issue or an unintended modification, the previous version can be retrieved from these backups. The template file can also be stored in SolidWorks PDM, but a local version must be cached (Versa Note is not able to retrieve the latest file version from PDM). More information on PDM file caching can be found here.
Import/Recycle Bin Tabs
Notes from other template files can be imported and merged into the current template using the Import tab in the Versa Note Admin application. Only unique notes will be imported, and duplicate notes will be skipped (notes are compared based on internal note ID #, not the contents of the note). Categories from other template files are imported along with the selected note, but Settings will not be imported.
Additionally, notes can be imported from Excel for convenience. To import notes from Excel, first generate an Excel import template using the ![]() button on the Import tab. This template can be populated with static note blocks and field values prior to importing. Be aware that note text and field selections are not analyzed for duplicates. For more information, check out our walkthrough video of the note import functionality.
button on the Import tab. This template can be populated with static note blocks and field values prior to importing. Be aware that note text and field selections are not analyzed for duplicates. For more information, check out our walkthrough video of the note import functionality.
When notes are deleted from the Versa Note Admin application interface, they are marked as deleted but remain in the template file; allowing future retrieval, if required. The Recycle Bin tab will display notes deleted from the current template and allow these notes to be restored. If the Recycle Bin list is empty, there are no deleted notes that can be retrieved from the active template file. Selected notes in the recycle bin can be cleared permanently by clicking the ![]() button.
button.
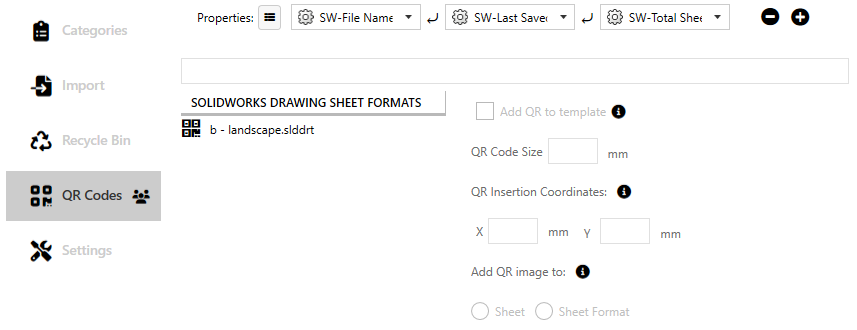
QR Codes Tab
Versa Note can be configured to automatically add QR codes to SolidWorks drawings, if desired. Each QR code consists of up to 5 configurable fields containing either a special value (such as drawing path, author, sheet count, etc.) or drawing custom properties.
Fields can be added/removed from the QR code using the ![]() and
and ![]() buttons. Custom properties can be added and removed much like drawing note fields, by clicking the
buttons. Custom properties can be added and removed much like drawing note fields, by clicking the ![]() button. The custom property name can be included in the QR code by toggling the
button. The custom property name can be included in the QR code by toggling the ![]() icon to solid.
icon to solid.
A sample QR code is provided in the user interface to test the results as you configure the QR fields. You may also select from a variety of field separator characters; the default character ⤶ adds a new line between fields.
QR codes can be enabled or disabled for each drawing sheet format, as required, after the drawing sheet format has been added via the ‘Settings’ tab in the Versa Note Admin application (by default, QR codes will be disabled when new sheet formats are added). Sheet formats with QR codes enabled will be highlighted bold. QR code size and position can be configured on each sheet format, and you can optionally opt to have Versa Note insert the QR in the drawing sheet format to deter users from deleting or re-positioning the code on the drawing.
QR codes are available exclusively to Enterprise license users and are available during the Versa Note trial period.
Auto Lock Notes
If the Preserve Note Numbering setting is enabled, notes can be locked automatically by an external process, such as a PDM approval workflow. To lock notes automatically, add a custom property called VersaNote_SetLock to the SolidWorks document with a value of Yes.

When the drawing or model is opened by the next user, its notes will be locked, and numbering will be preserved (i.e. re-ordering of existing notes is prohibited and deleted note numbers are retained, replacing note text with a pre-defined value (e.g. “DELETED”).
Notes can be unlocked through the Versa Note Editor UI at any time, as required.
VersaNote.Interop Public API
The Versa Note Interop, available from NuGet.org, enables your custom SOLIDWORKS add-in or macro to interact with Versa Note.
With VersaNote.Interop, you can read drawing sheet notes as well as add, remove or update notes, open the Versa Note Editor and even update linked annotations.
For help getting started, check out the usage documentation on NuGet.org, or contact us at support@cadinnovations.ca